


Performing a Webmin setup on Linux (AlmaLinux)
This article explains how to set up Webmin on AlmaLinux using Liquid Web servers, known for their high-performance capabilities and reliable infrastructure. By combining these technologies, you can optimize server management and ensure efficient web application operation.
By the end of the article, you will have a fully functional Webmin setup on AlmaLinux, enhancing your server administration experience and streamlining server management tasks. The sections contained in this post cover everything from initial server preparation to installing dependencies and configuring network settings. Detailed instructions and step-by-step guidance on configuring your AlmaLinux server hosted with Liquid Web are provided.
Key points
Here is a list of the key points to take from this article:
- What is Webmin and how to use this tool
- What are the prerequisites for performing a Webmin setup on AlmaLinux
- How can you install Webmin on AlmaLinux
- How do use Webmin to administer your server
- How can you update the Webmin tool
- How do you uninstall the Webmin tool
- Insights for server stability and performance with Webmin
What is Webmin?
Webmin is a free, open-source system administration tool that enables users to manage Unix-like systems through a web browser. Webmin offers a graphical user interface (GUI) for user account management, package installation, file management, and system settings configuration. Webmin's unique feature is its versatility and ease of use, making it accessible to users unfamiliar with complex command syntax and an ideal choice for administrators.
Webmin is a versatile tool that supports a variety of modules, allowing users to manage additional services and applications. Its extensibility and user-friendly interface make it a valuable asset for server administrators, especially in today's technology landscape. Webmin's ability to manage servers efficiently and simplify tasks is crucial due to the increasing complexity of server setups and the need for streamlined management processes.
Performing a Webmin setup on AlmaLinux
To perform a Webmin setup on AlmaLinux, please follow the below steps.
Prerequisites
The following list contains the prequisites inolved with a successful install and Webmin setup:
- Operating system. This tutorial requires that AlmaLinux 8 is installed on your Liquid Web server.
- SSH access. To install and configure Webmin on your Liquid Web server, root or sudo access is needed while using SSH access.
- Disk space. Confirm that you have at least 2 GB of free disk space on the server.
- CPU. Your server will be fine with any modern processor (a CPU with 1 GHz or faster performance).
- RAM. Make sure yo have at least 1 GB of RAM (2 GB of RAM or more recommended).
- Web server software. Ensure Apache Web Server has been installed on the Liquid Web server with a configured virtual configuration host.
- Your own domain. Remember that a Fully Qualified Domain Name (FQDN) pointing to your IP address of your Liquid Web server via a DNS A record is required to proceed.
Step #1. Access your Liquid Web server
To log into your Liquid Web server via SSH to in order to set up Webmin, walk through the steps in the following sections.
1.1. Open Terminal (Mac/Linux) or Command Prompt (Windows)
These apps are available through the applications on the system or by searching for them via the start menu.
1.2. Connect to your Liquid Web server
Use the ssh command and your server's IP address or hostname to establish a connection to your Liquid Web server. Replace your_username with the SSH username you received from Liquid Web and your_server_ip with your Liquid Web server's IP address or hostname:
ssh your_username@your_server_ip1.3. Enter your password
You'll be asked to enter the SSH password that Liquid Web provided you.
1.4. Verify your connection
After connecting, a command prompt should show that you are logged into your Liquid Web server over SSH. You can now proceed with the Webmin setup on your Liquid Web server.
Step #2. Adding the Webmin repository
The easiest and most effective method of downloading Webmin setup files is achieved by configuring repositories on your AlmaLinux system using the setup-repos.sh script.
2.1. Use the setup script
Your Webmin setup can be done in two simple steps as shown here:
curl -o setup-repos.sh https://raw.githubusercontent.com/webmin/webmin/master/setup-repos.sh
sh setup-repos.sh
The setup script referenced above automatically sets up the Webmin repository, installs the Webmin GPG keys on your AlmaLinux system, and provides a Webmin package for future installations and updates.
2.2. Review the script output
Here is the expected output:
[root@host ~]# curl -o setup-repos.sh https://raw.githubusercontent.com/webmin/webmin/master/setup-repos.sh
  % Total    % Received % Xferd  Average Speed   Time    Time     Time  Current
                                 Dload  Upload   Total   Spent    Left  Speed
100  5268  100  5268    0     0  26877      0 --:--:-- --:--:-- --:--:-- 27015
[root@host ~]# sh setup-repos.sh
Setup repository? (y/N) y
  Downloading Webmin key ..
  .. done
  Installing Webmin key ..
  .. done
  Setting up Webmin repository ..
  .. done
Step #3. Update your AlmaLinux system
Before installing Webmin, ensure that your Liquid Web server's operating system is up to date for security and performance reasons. To update the AlmaLinux system, run the following command:
sudo dnf updateStep #4. Install Webmin after selecting an install option with the corresponding steps
Option 4a. Installing Webmin via the package manager
To install Webmin using the package manager, run the following command:
sudo dnf install webminHere is the output:
[root@host ~]# sudo dnf install webmin
Last metadata expiration check: 0:00:13 ago on Sunday 31 March 2024 01:59:28 AM EDT.
Dependencies resolved.
==============================================================================================================================================================================================================================================
 Package                                                           Architecture                              Version                                                                   Repository                                        Size
==============================================================================================================================================================================================================================================
Installing:
 webmin                                                            noarch                                    2.105-1                                                                   webmin-noarch                                     39 M
-----
-----
Installed:
-----
-----
webmin-2.105-1.noarch
Complete!
Option 4b. Installing Webmin using a RPM package
To install Webmin using an RPM package, you must first ensure the required dependencies are installed on your AlmaLinux system:
sudo dnf install perl-Digest-SHA perl-open unzipTo download the Webmin RPM package, run the following command:
wget https://www.webmin.com/download/rpm/webmin-current.rpmHere is the output:
[root@host ~]# wget https://www.webmin.com/download/rpm/webmin-current.rpm
--2024-03-31 14:11:14--  https://www.webmin.com/download/rpm/webmin-current.rpm
Resolving www.webmin.com (www.webmin.com)... 216.105.38.11
---
---
Saving to: ‘webmin-current.rpm’

webmin-current.rpm                                          100%[=========================================================================================================================================>]  38.99M  25.3MB/s    in 1.5s

2024-03-31 14:11:20 (25.3 MB/s) - ‘webmin-current.rpm’ saved [40888368/40888368]
Then, install the downloaded RPM package by running the following command:
sudo rpm -Uvh webmin-current.rpmHere is the output:
[root@host ~]# rpm -Uvh webmin-current.rpm
warning: webmin-current.rpm: Header V4 DSA/SHA1 Signature, key ID 11f63c51: NOKEY
Verifying...                          ################################# [100%]
Preparing...                          ################################# [100%]
Updating / installing...
   1:webmin-2.105-1                   ################################# [100%]
If you want to learn how to complete a Webmin setup on the Ubuntu distribution of Linux, please refer to the article entitle Perform a Webmin setup on Ubuntu. To run multiple PHP versions in Webmin, you can refer to the How to set up multiple PHP versions in Webmin guide.
Step #5. Start Webmin
After installing Webmin, you will need to start the service.
5.1. Start the Webmin service
Run the following command to start the Webmin service:
sudo systemctl start webmin5.2. Check the Webmin service
To check the Webmin service, run the following command.
sudo systemctl status webmin5.3. Review the status output
Here is the output:
[root@host ~]# sudo systemctl status webmin
● webmin.service - Webmin server daemon
   Loaded: loaded (/usr/lib/systemd/system/webmin.service; enabled; vendor preset: disabled)
   Active: active (running) since Sun 2024-03-31 02:25:03 EDT; 4min 10s ago
  Process: 159048 ExecStart=/usr/libexec/webmin/miniserv.pl /etc/webmin/miniserv.conf (code=exited, status=0/SUCCESS)
 Main PID: 159049 (miniserv.pl)
    Tasks: 1 (limit: 24249)
   Memory: 27.4M
   CGroup: /system.slice/webmin.service
           └─159049 /usr/bin/perl /usr/libexec/webmin/miniserv.pl /etc/webmin/miniserv.conf
Step #6. Add a firewall rule
Next, you will need to add a firewall rule.
6.1. Allow access to the Webmin port 10000 on the firewall
Run the following command to allow access to the Webmin port 10000 on the firewall:
sudo firewall-cmd --add-port=10000/tcp --permanent6.2. Reload the firewall and validate the enabled rules
Then, run the following commands to reload the firewall and validate the list of enabled rules:
sudo firewall-cmd --reload
sudo firewall-cmd --list-all
Step #7. Access Webmin via a browser
Once Webmin is installed, you will want to access the web application via a browser.
7.1. Navigate to the appropriate URL
Open your web browser and enter the URL of https://your-server-ip-address:10000. Replace your-server-ip-address with your Liquid Web server IP address. For example, https://192.168.1.100:10000. You will be taken to the following login page:
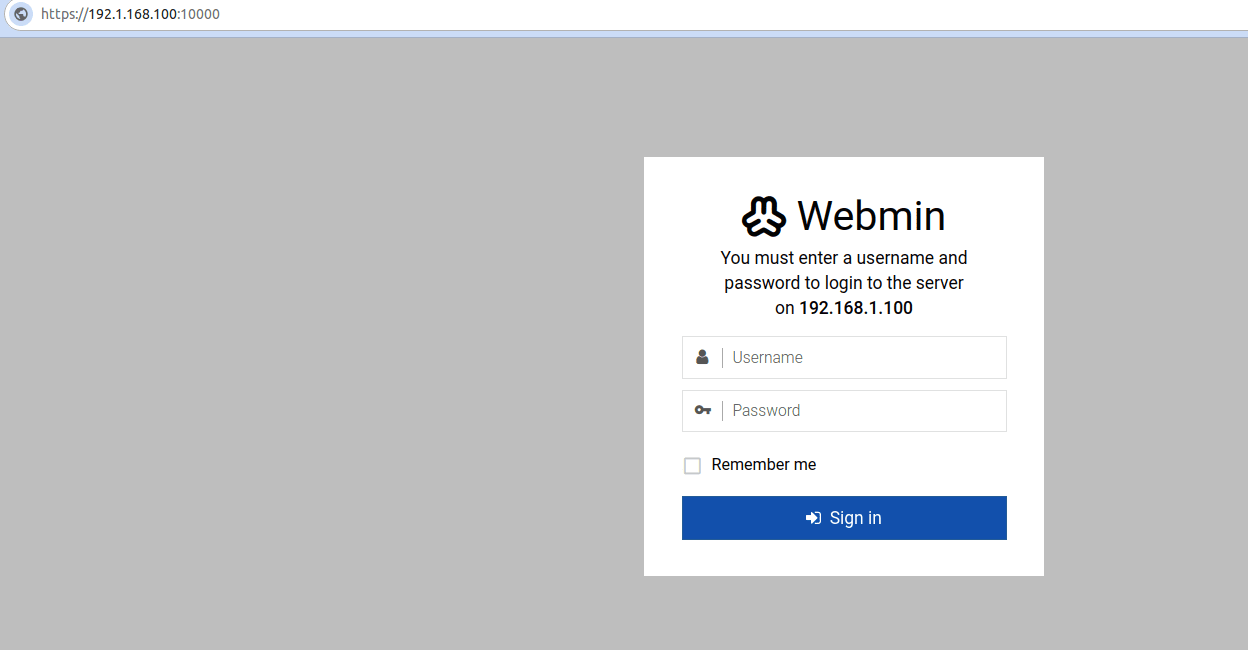
7.2. Log into the Webmin Dashboard
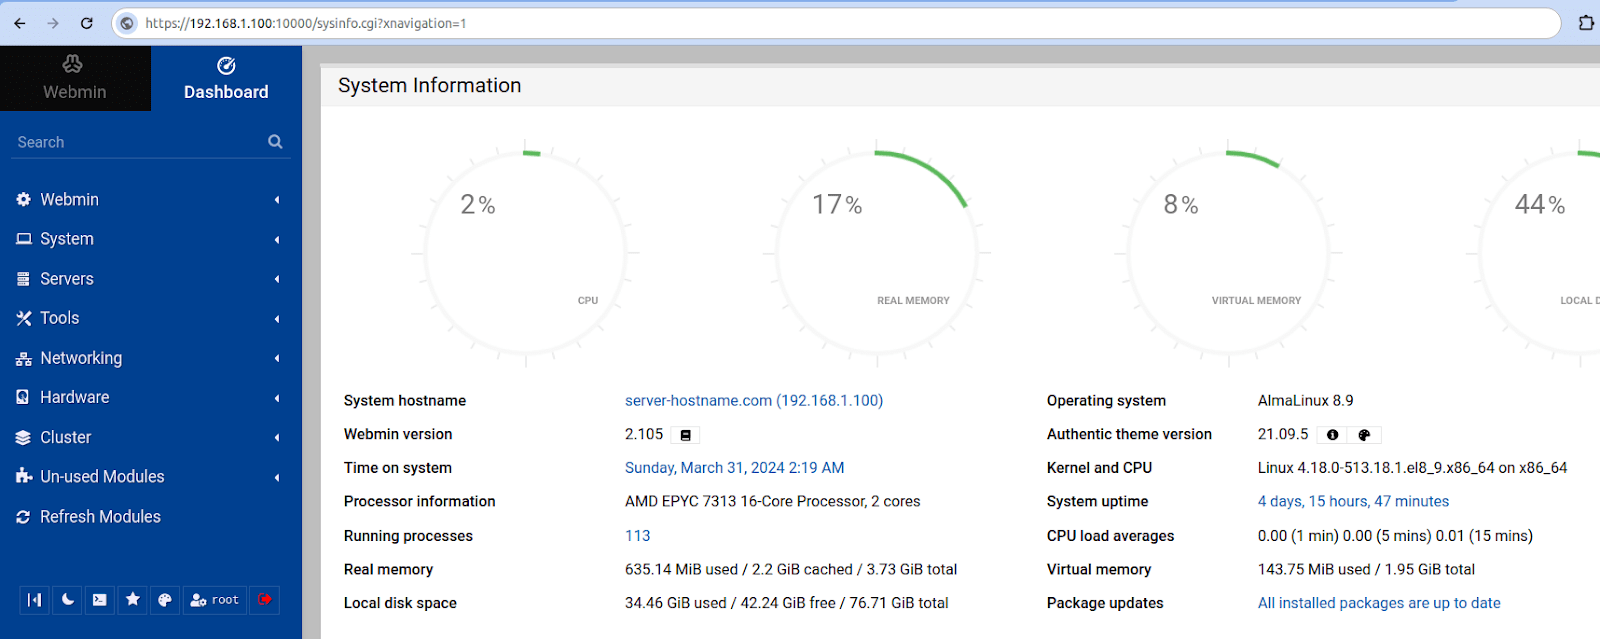
Type in your Liquid Web server’s username and password and click the Sign In button to log in. You will be redirected to the Webmin Dashboard:
How to use Webmin
Here's a brief overview of the Webmin Dashboard and how to use its key features.
Viewing system information
System information can be viewed via the interface. You can see the details pertaining to your AlmaLinux system's hardware and software configuration in this area.
Entering the system hostname
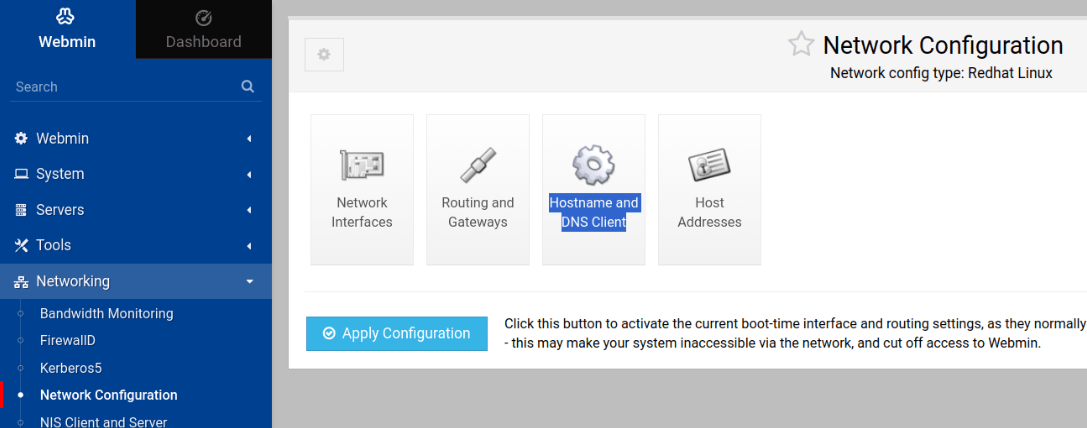
You must create a virtual host to set up and utilize Webmin with the hostname. To configure an Apache virtual host, please refer to the article How to configure Apache virtual hosts on AlmaLinux. Here, we use server-hostname.com as the new hostname. You can follow the steps provided here to update the system hostname from the Webmin Dashboard:
1. Select the Networking option found in left navigation bar.
2. Then, click the Networking > Network Configuration menu entry. On the screen that appears, click the Hostname and DNS Client tile as shown here:
3. Enter the new hostname in the Hostname field:
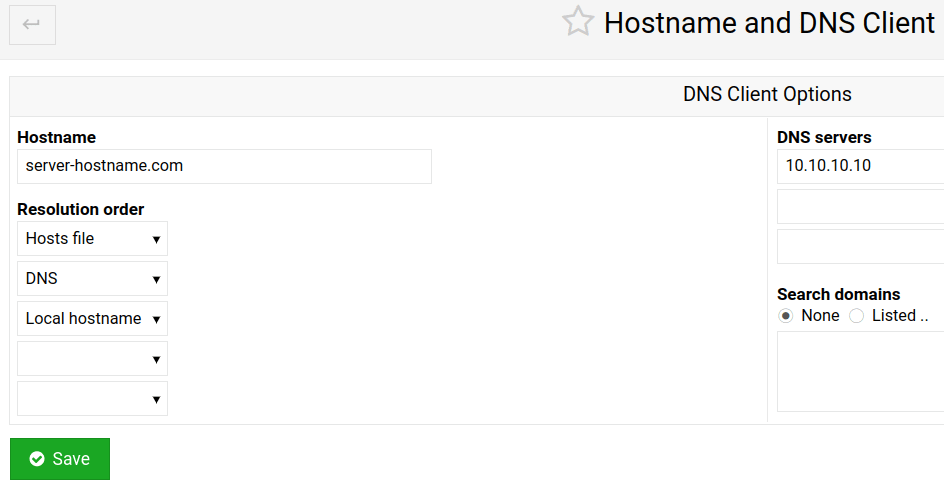
4. Click Save to apply the changes.
Managing services with regard to bootup and shutdown
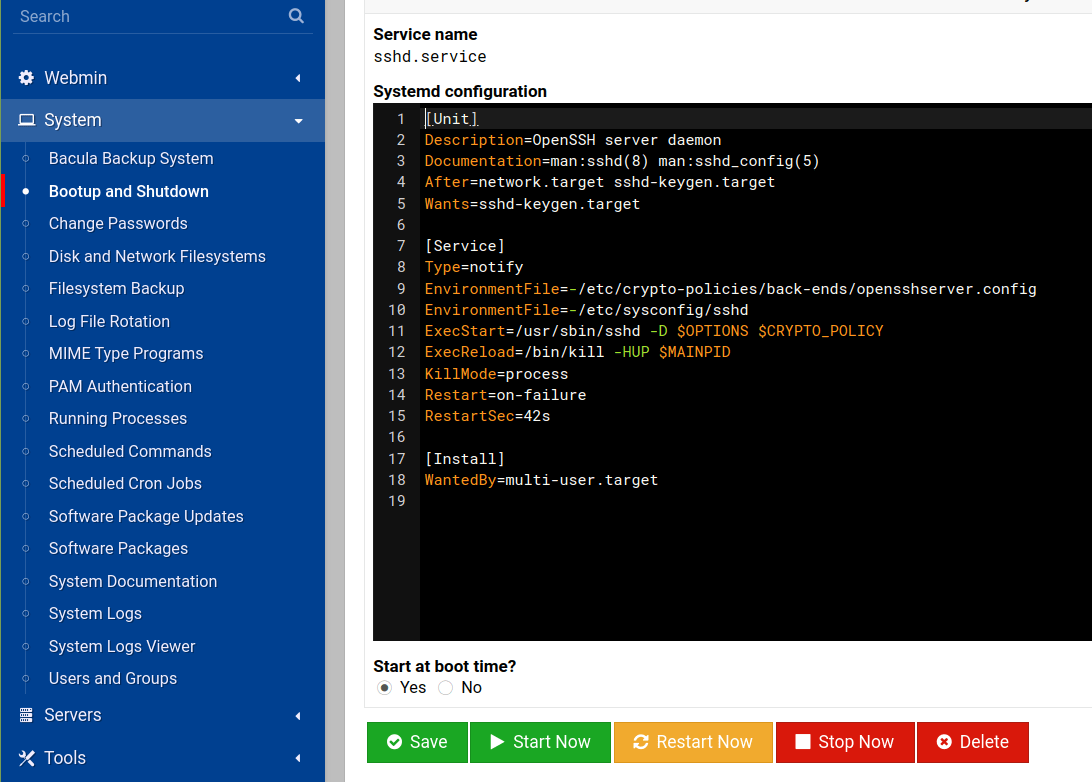
To manage services with regard to bootup and shutdown events, take these steps:
1. Click the System option found in the left navigation bar.
2. Next, click the System > Bootup and Shutdown menu entry.
3. On the screen to the right of the left navigation bar, you are able to manage services that start or stop automatically by selecting them from the list and clicking on the appropriate radio or regular buttons provided that include Start at Boot Time? Yes/No, Start Now, and Stop Now — among others:
Managing the networking configuration details
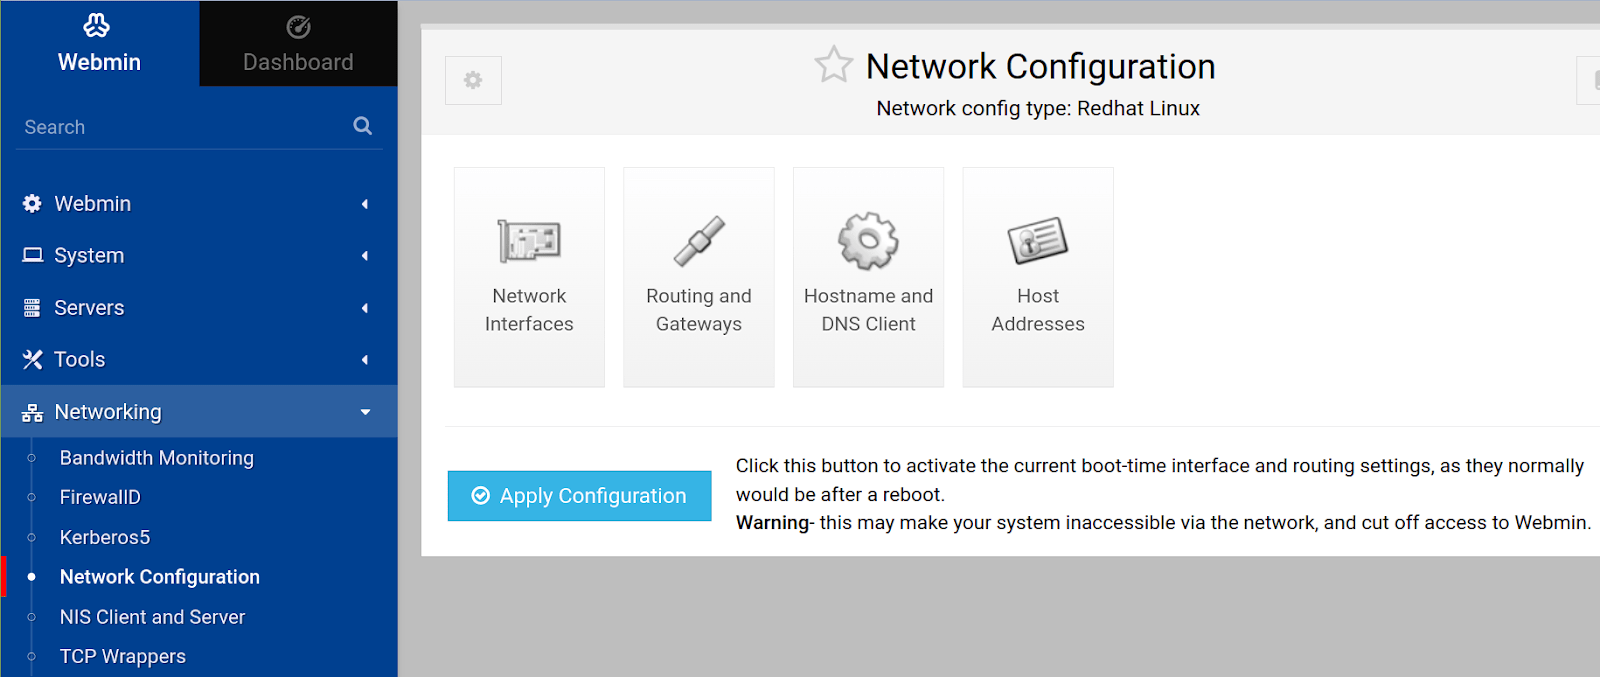
To manage the networking configuration details, review this step-by-step guidance:
1. Click the Networking option found in the left navigation bar.
2. You can configure network interfaces by clicking the Networking > Network Configuration menu entry and selecting the interface you want to manage. Once configured, click the Apply Configuration button to reflect the changes.
3. The relevant options on the Networking Configuration screen represented with this screenshot allow you to set up routing, manage DNS settings, and control firewall rules:
Managing hardware components
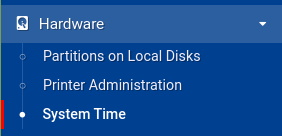
To manage hardware components using Webmin, follow these instructions:
1. Click the Hardware top-level menu entry option found in the left navigation bar.
2. Manage hardware components such as disk drives, printers, and system time by selecting the appropriate option from the list of menu entries under the Hardware option:
Managing software packages
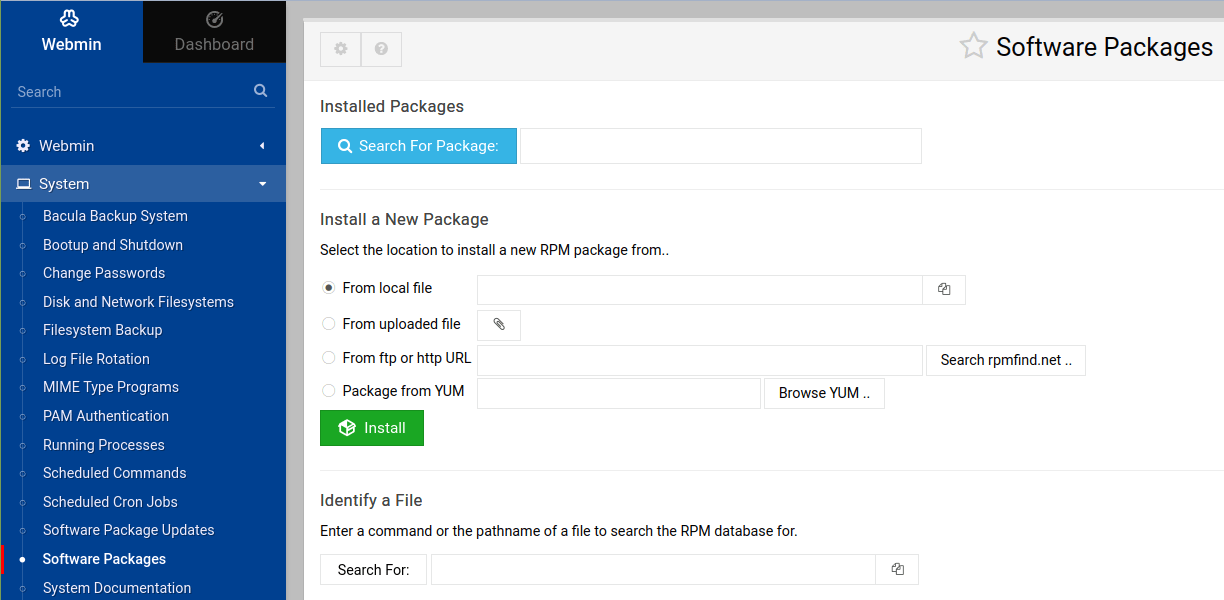
To manage software packages, you would use these options found within Webmin:
1. Click the System menu option located in the left navigation bar.
2. Then, find and click the Software Packages option under System.
3. Install, remove, and update software packages using the package manager interface depicted here:
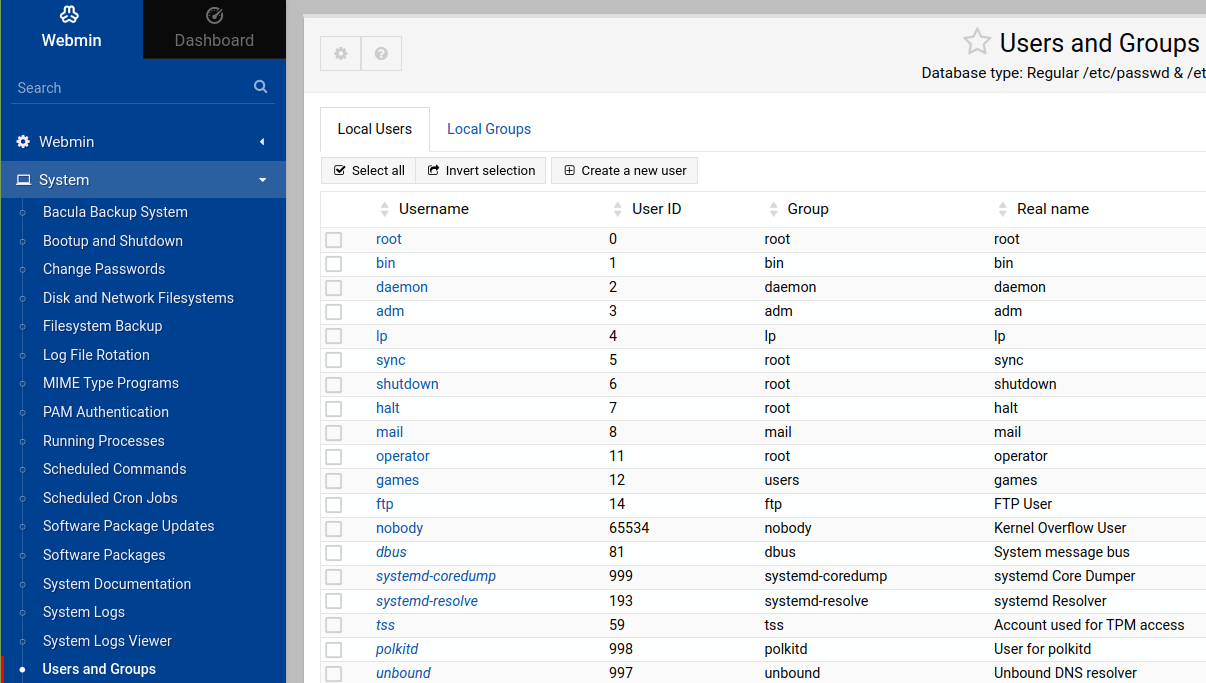
Managing users and groups
Users and groups can be managed from within the Webmin Dashboard in a straightforward manner:
1. Select the System > Users and Groups item in the left navigation bar.
2. When, the screen below appears, manage user accounts and groups by creating, editing, or deleting them as needed:
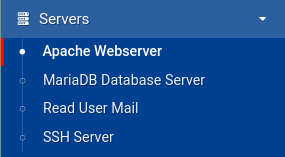
Managing various various server-related configurations
This top-level menu option with the name Servers in the left navigation bar typically contains modules for managing various server-related configurations as shown:
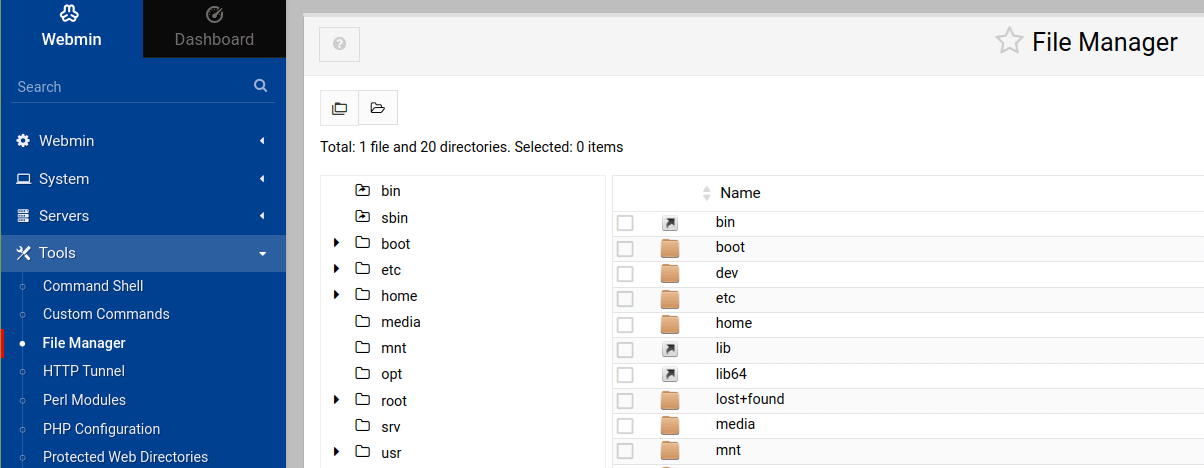
Using the file management features
To use the file management functionality, you would explore these options found within Webmin:
1. Locate and select the Tools menu item on the left side of the screen.
2. Next, under Tools, click File Manager.
3. Browse and manage files and directories on the system, including uploading and downloading files as needed:
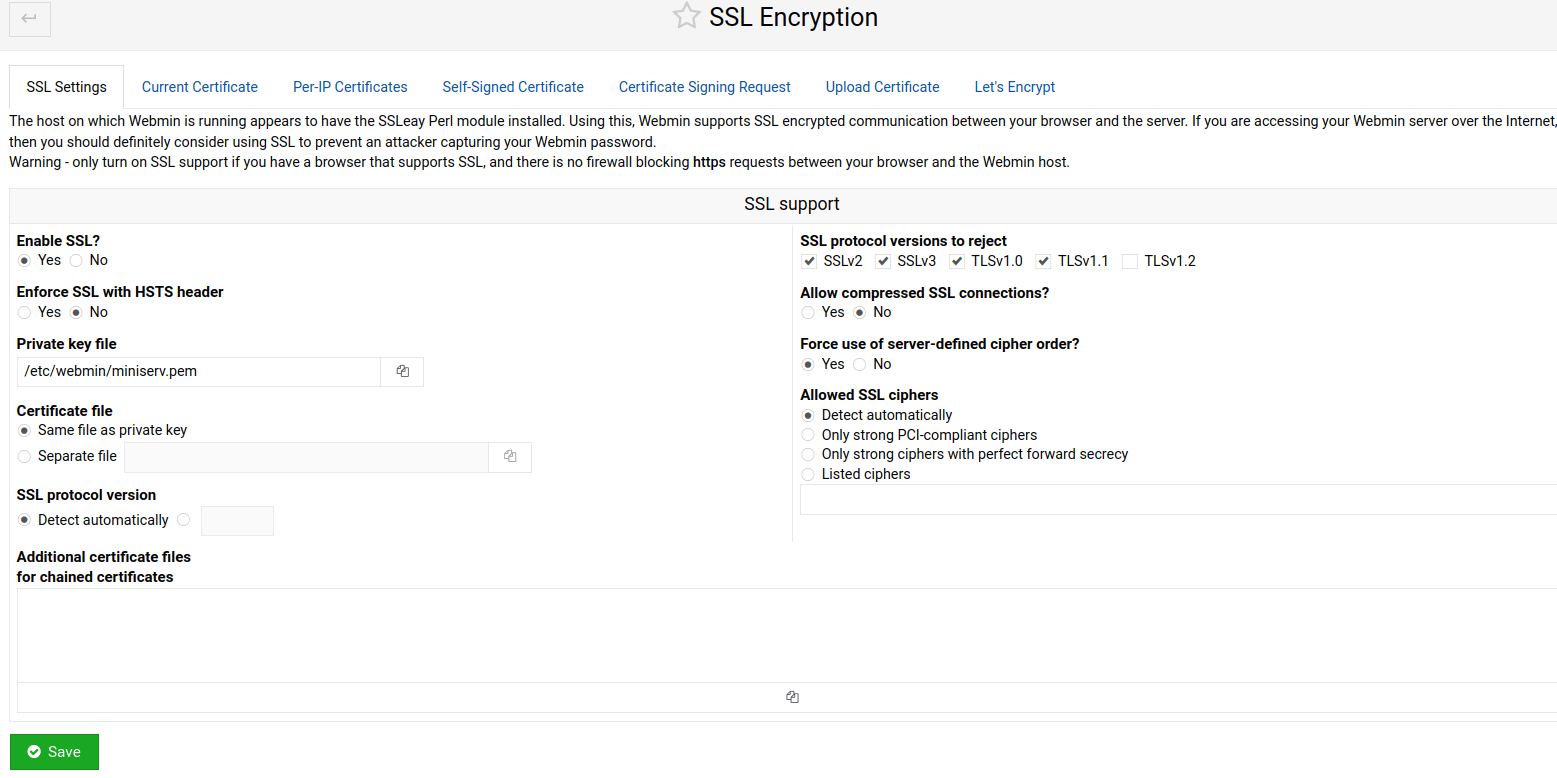
Configuring SSL encryption
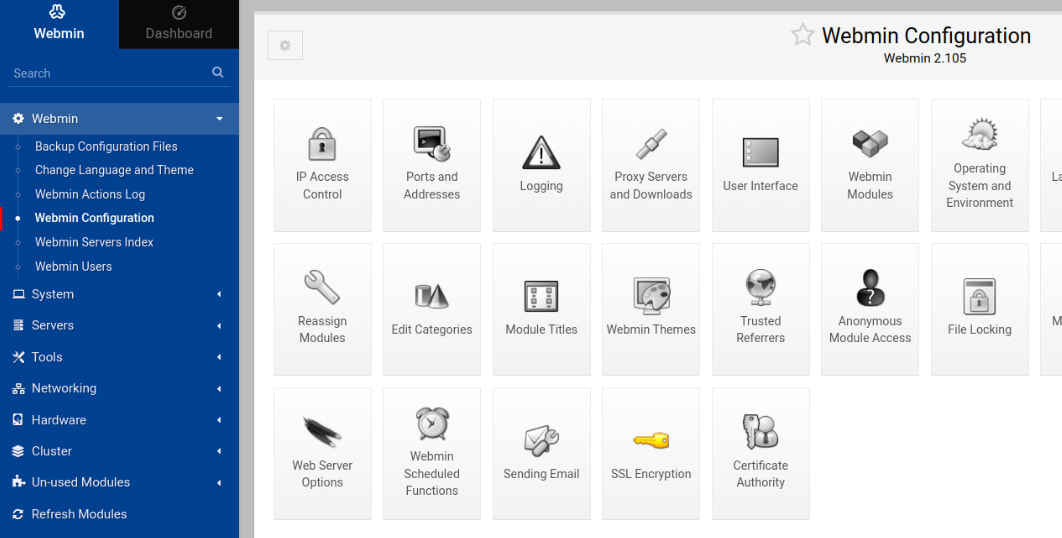
Admins can set up SSL encryption from the Webadmin Dashboard by using the functionality revealed with these steps:
1. First, click the Webmin menu entry listed in the navigational panel on the left.
2. Then, select the Webmin Configuration menu option followed be the SSL Encryption tile shown in the last row of tiles on the Webmin Configuration screen:
3. Follow the prompts to generate or upload SSL certificates to secure web-based services and click the Save button to reflect your changes in the system:
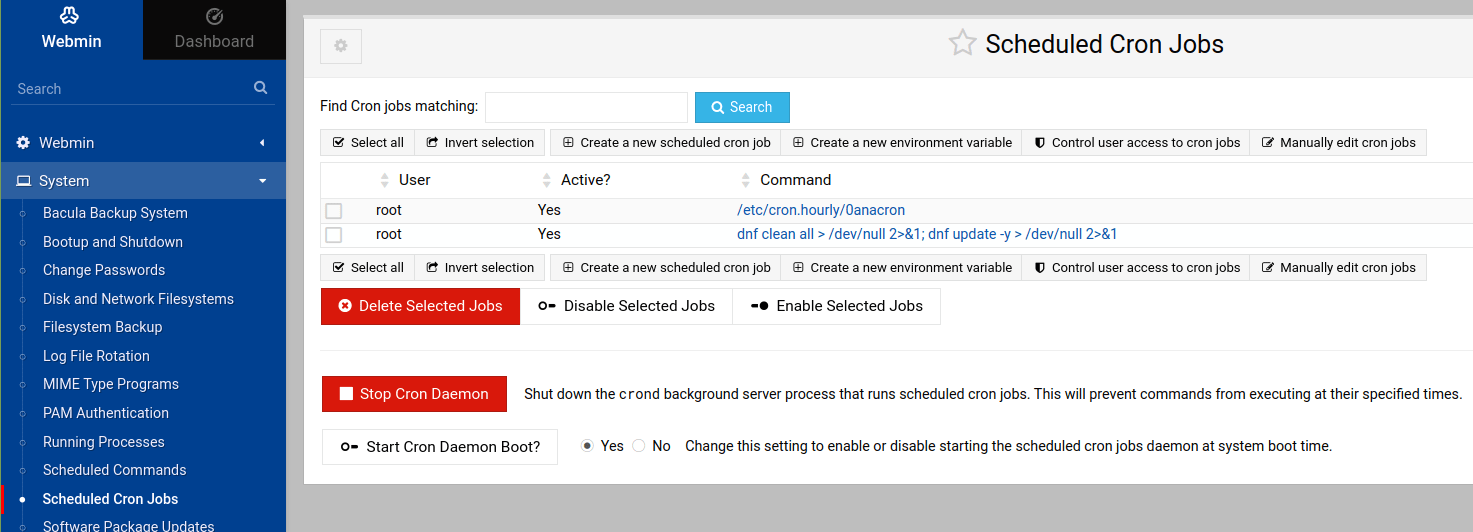
Managing and scheduling cron jobs
All admins of Linux systems are expected to leverage cron jobs for various activities. These cron job are can be managed and scheduled from the Webmin Dashboard:
1. Highlight the System menu entry in the panel on the left.
2. Next, click System > Scheduled Cron Jobs within the navigational panel.
3. Now you may manage scheduled tasks (cron jobs) that run at specified times or intervals by adding, editing, or deleting them as needed:
How to update Webmin
There are primary methods for updating Webmin. Those are covered in the next subsections.
Updating Webmin via the package manager
To update Webmin using the package manager, run the following command:
sudo dnf update webminUpdating Webmin via the RPM package
To update Webmin using the RPM package, run the following command:
sudo rpm -Uvh webmin-current.rpmThe command will update an existing Webmin installation to the version provided in the webmin-current.rpm package. If Webmin is not already installed, it will install it.
How to uninstall Webmin
As expected, you have the option to uninstall Webmin via the package manager or the RPM package.
Uninstalling Webmin via the package manager
To uninstall Webmin using the package manager, run the following command:
sudo dnf remove webminUninstalling Webmin via the RPM package
To uninstall Webmin the RPM package, run the following command:
sudo rpm -e webminEnsuring server stability and performance with Webmin setup on your Liquid Web server
Setting up Webmin on AlmaLinux using Liquid Web servers and selecting Liquid Web hosting plans offers a comprehensive and efficient solution for server management. Webmin's user-friendly interface and extensive features give administrators the tools to manage their servers effectively. Liquid Web servers, combined with Liquid Web hosting plans, ensure reliable performance and support, making them an ideal choice for hosting Webmin.
Users can benefit from various features and services designed to enhance their server management experience by choosing Liquid Web hosting plans. From reliable uptime to responsive customer support, Liquid Web hosting plans offer a reliable and robust platform for hosting Webmin. Overall, the combination of Webmin, Liquid Web servers, and Liquid Web hosting plans provides a powerful solution for server management, empowering administrators to manage their servers quickly and confidently.
Related Articles:


About the Author: Mohammed Noufal
Mohammed Noufal is a B.Tech graduate with a decade of experience in server administration and web hosting. He is a father to two daughters and finds fulfillment in their growth. In his free time, he enjoys blogging, sharing experiences, and listening to music. With a strong technical background, family commitment, and creative outlets, he represents a well-rounded life journey.


Our Sales and Support teams are available 24 hours by phone or e-mail to assist.
Latest Articles
How to install PyTorch on Linux (AlmaLinux)
Read ArticleInnovative armor — exploring ThreatDown’s impact on cyber defense
Read ArticleControlling PHP settings with a custom php.ini file
Read ArticleLinux dos2unix command syntax — removing hidden Windows characters from files
Read ArticleChange cPanel password from WebHost Manager (WHM)
Read Article